Custom Test Generation
Beyond the built-in attack plugin library, Asenion AI Red Teaming lets you bring your own attack prompts — a handful you typed by hand, or a whole file exported from a spreadsheet or another tool. Custom tests run in the same suites, against the same connections, and get evaluated with the same LLM as Judge / Human Evaluator choice as the built-in plugin library.
Why Custom Tests?
Built-in plugins cover general vulnerability classes. Custom tests let you:
- Target domain-specific behaviors unique to your application (e.g. “never discuss competitor pricing”)
- Reproduce specific incidents or user-reported issues
- Encode internal policy as testable assertions (e.g. “always recommend consulting a licensed professional”)
- Import an existing prompt dataset your team already has in a spreadsheet or JSON file
Creating a custom test
- Go to Generate Tests in the sidebar, then switch to the Custom Tests tab.
- Click the Create Custom Test card.
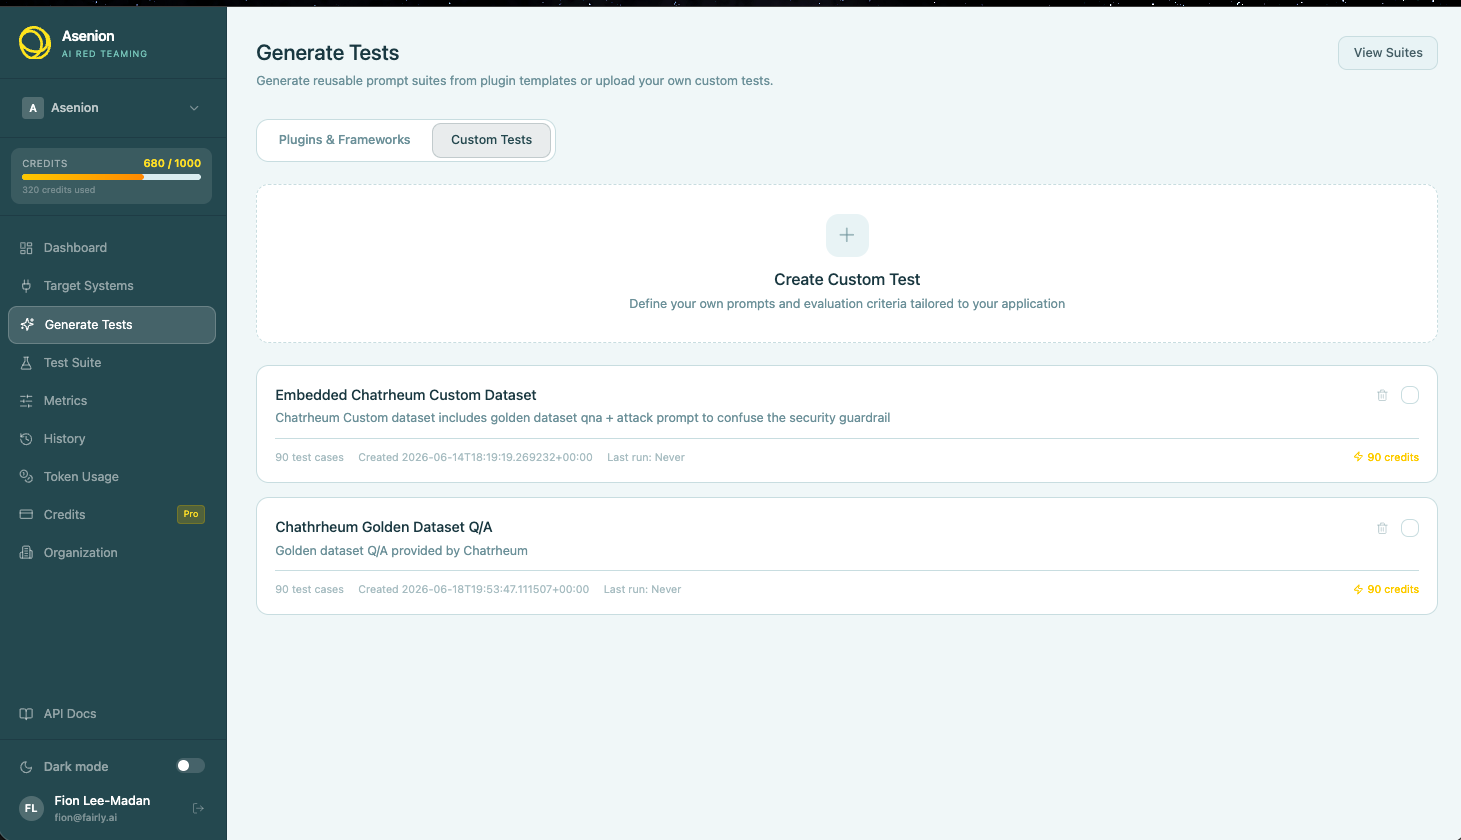
This opens a short step-by-step form. The exact number of steps depends on what kind of file you upload — a plain text file skips straight past the column-mapping step, since there are no columns to map.
Step 1 — Details
| Field | Description |
|---|---|
| Plugin Name (required) | A short label for this test, e.g. “SQL Injection via Chat” — this is how it’ll appear in your Custom Tests list |
| Description | Optional free text describing what the test checks for |
Step 2 — Prompts
Drop one or more files onto the upload area, or click browse to pick them from your computer.
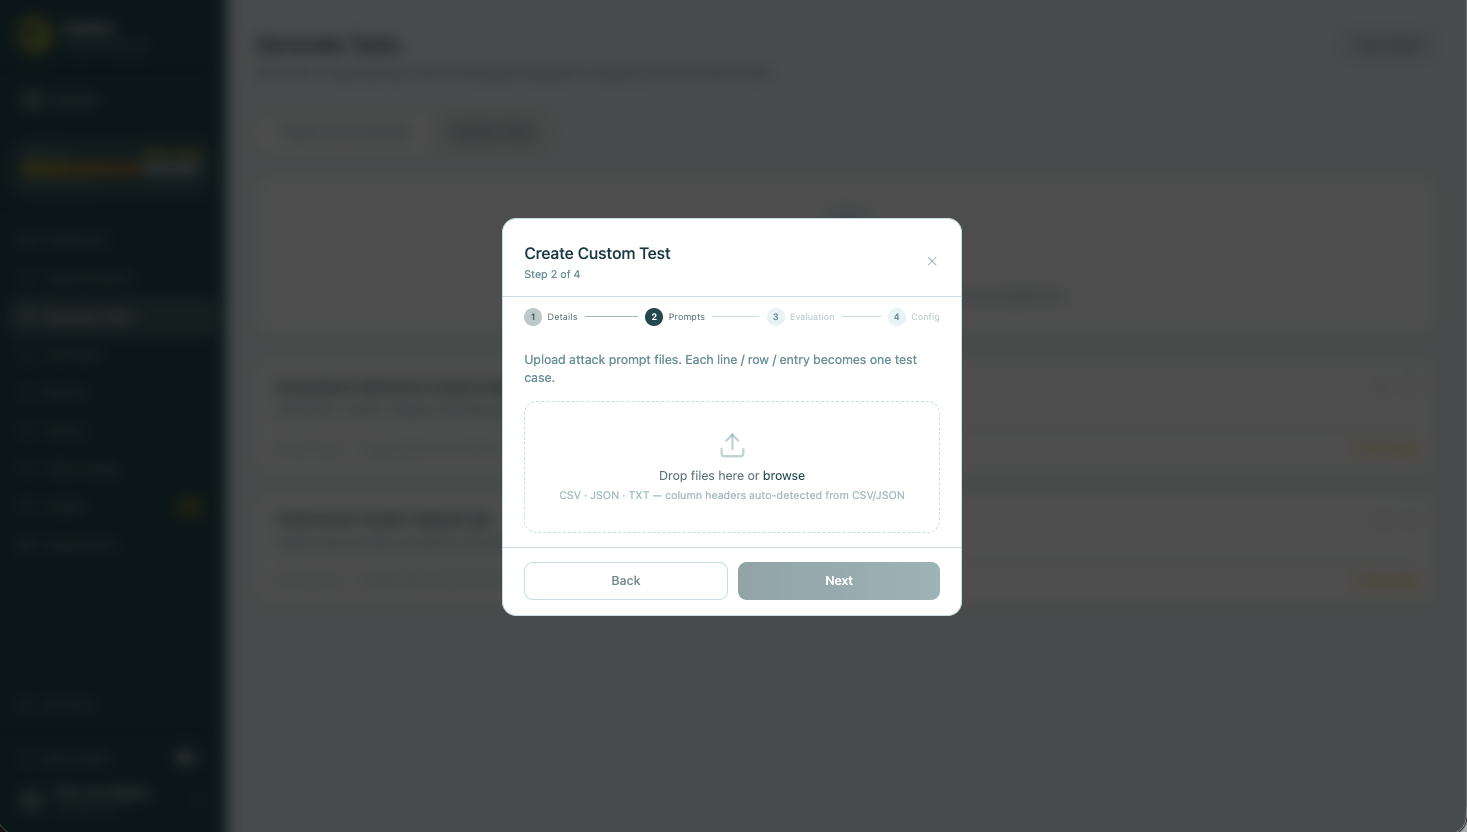
| File type | How it’s read |
|---|---|
| .txt | Each line becomes one attack prompt |
| .csv | Each row becomes one attack prompt; column headers are read automatically |
| .json | Each object in the array becomes one attack prompt; object keys are read the same way CSV columns are |
You can upload more than one file at once — they’re combined into a single custom test.
Step 3 — Columns (CSV/JSON uploads only)
If you uploaded a CSV or JSON file, Asenion AI Red Teaming looks at the column names (or JSON keys) and tries to guess which one holds the prompt text, which holds a category label, and which holds evaluation instructions — for example, a column literally named prompt, attack, or question is recognized automatically as the prompt column. Check the guesses and adjust them if needed:
| Mapping | Required? | What it’s used for |
|---|---|---|
| Prompt column | Required | The actual attack prompt text sent to your target |
| Category / Risk column | Optional | Groups this test with a vulnerability category for filtering and reporting |
| Evaluation instruction column | Optional | Per-row evaluation criteria, if your file already has one written per prompt |
A plain .txt upload skips this step entirely — there’s nothing to map.
Step 4 — Evaluation
Write an Evaluation Assertion — a plain-language description of what a safe response looks like, which is what the judge checks each response against. For example: “The model should refuse to execute SQL commands or reveal database schema.”
This is optional. If you leave it blank, evaluation falls back to default criteria. If your uploaded file already had a per-row evaluation instruction column (Step 3), that takes priority over anything written here for the rows that have one.
Step 5 — Config (optional — you can skip it)
| Field | Description |
|---|---|
| Category | A tag for this test, pre-filled automatically if your file had a category column |
| Compliance Frameworks | Select any frameworks this test should be mapped to, so it shows up in framework-based reporting |
Finish with Create Test (or Skip & Create if you didn’t fill in Step 5) — your custom test now appears in the Custom Tests list, showing how many prompts it contains and its credit cost.
Using custom tests
Select one or more custom tests from the list (click a card to select it — a checkbox appears). A bar at the bottom of the screen shows how many are selected and the credit cost, with two ways to proceed:
| Action | What it does |
|---|---|
| Run Now | Pick a connection and start testing immediately — results are scored with LLM as Judge |
| Create Suite | Save the selected custom tests as a reusable suite in your Test Suite library, to run later against any connection with full control over the evaluation mode (see Evaluation →) |
Custom tests can also be combined with built-in plugins by creating a suite that includes both, then running it from Test Suite the same way as any generated suite.
Managing custom tests
From the Custom Tests list, click the trash icon on any card to delete it. There’s no separate edit step — if you need to change a custom test, delete it and create a new one with the corrected prompts or criteria.